Facebook
 Google
 GitHub
 Linkedin
Introduction to Energy Meter Calibration
This article will guide engineers and technicians through procedures, precautions, and the importance of carrying out electrical energy meter calibration.
All electrical and electronic measuring equipment is prone to errors caused by external or internal factors. The errors can be removed through a process known as equipment calibration.
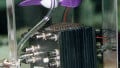
Image used courtesy of Adobe Stock
The energy meter undergoes calibration, too. This is the process used to determine and eliminate errors during energy measurement. Some of the factors that inject errors in an energy meter are current errors caused by phase angle, voltage transformers, and errors caused by crystal oscillators.
Successful Energy Meter Calibration
An electric energy meter is designed to have specified characteristics and parameter constants that deliver necessary information about disc revolution counts and energy measured in joules. These characteristics and parameter constants are specified by the energy meter manufacturers. Below is the setup that makes meter calibration successful.
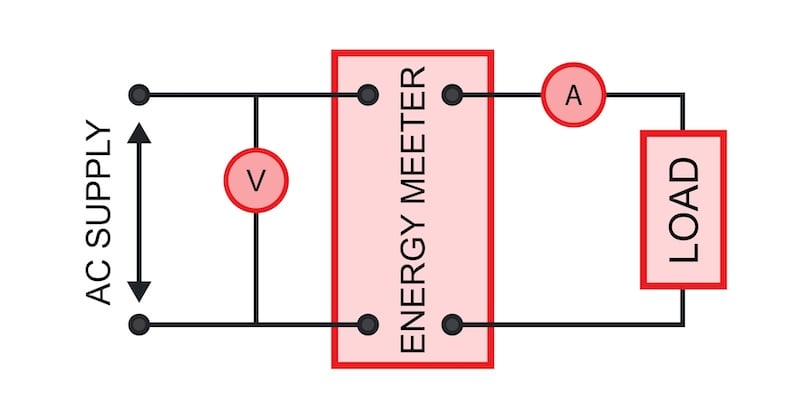
Figure 1. Calibration Circuit Connection for Energy Meter. Image used courtesy of Simon Mugo
Before energy meter calibration takes place, make sure to complete adjustments of load, creep, lag, and so on. Generally, the energy meter number of revolutions is very high, and its measurement cannot be achieved in electric laboratories. Therefore, we have to make several assumptions for us to achieve our goal. The number of revolutions (m) in the energy meter disc is 10 for n joules of electric energy in the characteristic constant.
From the assumption, we can carry out the calculation of the energy (E), which is computed from m using the equation;
\[E=\frac{10m}{n}J\]
If the energy calibrated for the 10 revolutions is equal to the energy that is consumed by the load for that amount of time and revolution, the energy meter has no error. The energy that is consumed by the load is given by denotation ET. This energy is also known as true energy hence the denotation.
The loads applied to the energy meter are placed under variation and the time that is taken for 10 revolutions is estimated using a stopwatch and recorded. Parameters such as current and voltages are observed using necessary equipment and tabulated as recorded in the table below.
Table 1. Recording Calibration Measures
|
S. No. |
Current (A) |
Voltage(V) |
Power(P) Watts |
Energy (E1=PTJ) |
% Error |
|
|
|
|
|
|
|
The reading that is fed in the table above is observed from the test that is carried out.
For the specific revolution, the meter energy E remains constant while the energy that is consumed by the load ET is varied and calculated theoretically. Therefore, when the meter is under various electric loads, we can compute the percentage error by involving the formula listed below:
\[\%Eror=(\frac{E-E_{T}}{E_{T}})\times100\]
The Calibration Curve
The energy meter calibration can be obtained by the use of a graph. This is made possible by plotting a graph of percentage errors against the current values, I. The graphical representation of the energy meter calibration is known as the calibration error. Initially, the load current is valued at zero, and therefore, there is no percentage error because the values of the energies E and ET are zero. The figure below is an example of the energy meter calibration curve.
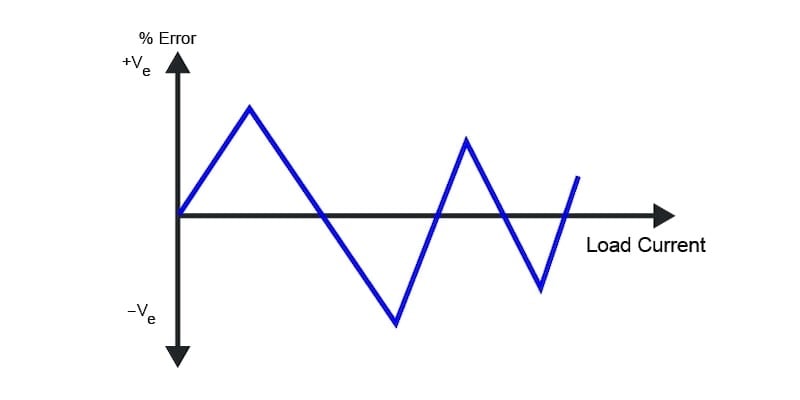
Figure 2. The Calibration Curve Graph. Image used courtesy of Simon Mugo
The error calculated in percentage can be negative or positive. The load current error limits can be decided by just having a close study and observation of the drawn calibration curve. If the limit happens to be outside the desired option, then you have to adjust the error range to the desired range by application of different adjustments, for example, friction, lag, and creep.
Energy Meter Calibration Procedure
Below is a step-by-step procedure used to calibrate the energy meters.
- Connection your circuit as per the circuit drawn in figure 1 above.
- Check the meter-rated voltage and supply it to the meter that is at no load initially.
- Confirm that in your connection, the current coil has been connected in series with the electric load, and the pressure coil is at shunt with the input voltage from the supply.
- Record the current, voltage, and time for the particular disc revolution.
- Using the percentage error formula listed above, compute the theoretical error in percentage.
Energy Meter Calibration Precautions
While undertaking Energy meter calibrations, ensure the following precautions are taken:
- Never make a loose connection to the meter under calibration.
- Between the observer and the calibration circuit terminal should not exist any physical mode of contact.
- Before taking any reading, ensure the energy meter is connected to the electric load for about 15 minutes. This will help eliminate temperature and friction errors.
- Make sure to note the readings carefully.
- To achieve a precise or accurate error, more readings should be taken to help calculate the mean or average error.
Advantages and Takeaways of Energy Meter Calibration
Energy meter calibration offers several important advantages:
- Acts as a guard against potential trouble to the system or instrument while offering great data traceability and reporting.
- Gives the equipment a chance to undergo maintenance to eradicate several other problems.
- Allows energy meters to report reliable data output.
- Reduces the cost of energy and helps improve profitability.
The article has highlighted the following important information that a calibration engineer and technician should know:
- Calibration is the process of eradicating errors in any electronic measuring equipment or tool.
- An electric energy meter undergo calibration to make sure that errors are eradicated and the tool function as per the manufacturer’s specification.
- Calculation of the percentage error formula has been highlighted, and the calibration curve is drawn.
- The calibration procedures, precautions, and importance have been highlighted.