Facebook
 Google
 GitHub
 Linkedin
From Arrays to Inverters—Here’s Your PV System Checklist
This article outlines the essential final checks required before starting up a PV system, including array configuration, wire management, grounding, junction boxes, combiner boxes, array mounting, conductor ratings, battery bank configuration, charge controller connections, inverter checks, load entry connections, and signage requirements.
A final inspection is crucial before starting a photovoltaic (PV) system to ensure everything is in order. The checklist includes verifying the array configuration, checking wire management, grounding, component installation, fastening and flashing, assessing foundation strength, conductor sizing, battery bank setup, charge controller and inverter connections, load entries, and signage. This thorough inspection is essential to guaranteeing the system's safety and efficiency when it is started.

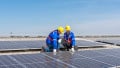
Solar array mounted on a rooftop. Image used courtesy of Wikimedia Commons
A final check of the installation has to be done before the system is started. Table 1 lists the items that should be checked one last time before the PV system is started. Make sure all system disconnects are in the OFF position for the final check.
Table 1. Final Inspection Checklist
|
✓ |
Item to Check |
|
|
The array configuration is correct, and the proper number and model of PV modules are used. |
|
|
The array conductors are arranged and supported neatly and Code-compliantly. |
|
|
All grounding is done according to the manufacturer’s instructions and the NEC. |
|
|
All junction boxes, conduit bodies, and disconnect switches are accessible and suitable for outside installations. |
|
|
The combiner box is placed in an easily accessible location and is suitable for outside installation, and the fuses or circuit breakers used to protect module strings have the correct current and voltage ratings. |
|
|
The array is firmly secured to the mounting rack using the hardware provided or specified by the manufacturer, ensuring proper flashing of all roof penetrations and confirming the strength of foundations and mounting structures to withstand high wind conditions. |
|
|
The conductor insulation is suitable for wet locations, the wiring used to make module-to-module connections is USE-2 or an identified and listed PV cable, the conductors used in conduit have insulation suitable for wet locations, and the size of the conductors will adequately carry the supplied current and keep the voltage drop to an acceptable level. |
|
|
The battery bank configuration is correct, and the proper number and model of battery are used; all wiring connections are tight and are arranged and supported in a neat and Code-compliant manner; and the disconnect means, and overcurrent protection for the battery bank is connected and sized properly. |
|
|
All charge controller connections are correct and tight, and all operating parameters are correct. |
|
|
All inverter connections are correct and tight, and all operating parameters are correct. |
|
|
The connections to the load entry are correct and tight, and all branch circuits have the proper overcurrent protection. |
|
|
All signs are made to withstand an outdoor environment, the lettering is a color that contrasts with the sign background, the signs are located correctly, and the signs have the required information on them. |
The final check is usually started at the PV system array and moves through the various system components until you are at the load entry supplying electrical loads in a stand-alone PV system or at the service-entrance equipment in a grid-tied PV system. It is a good idea to take digital photographs of the different parts of the PV system for future reference.
Array Configuration
Begin the final system check by verifying that the array configuration is correct and that the proper number and model of PV modules are used. The array should be configured to match the electrical diagram for the system design. Remember, it needs to deliver the proper voltage and current to the other system components so that the electrical loads can be properly powered.
Wire Management
Then, check the wire management at the array. Ensure the array conductors are arranged and supported neatly and in compliance with code. They should not be lying on roofing materials or resting against sharp or abrasive surfaces. Also, ensure that all PV module interconnections with MC connectors are properly engaged.
Array and Module Grounding
The next items to check are array and module grounding. Make sure that all grounding is done according to the manufacturer’s instructions and the NEC. Check that the array support structure has been grounded properly and all grounding connections are using screws and lugs listed for outdoor use exposed to the weather. Also, make sure that no bare copper conductors are in contact with the aluminum rails or module frames.
Junction Boxes, Conduit Bodies, and Disconnect Switches
Then, check that all junction boxes, conduit bodies, and disconnect switches are accessible and suitable for outside installations. Electrical junction boxes and conduit bodies are allowed to be placed under PV modules only if the modules can easily be removed while work is being done in the box or conduit body.
NEMA Type 3R disconnect switch enclosures are typically rated for installation only in an upright vertical position. Mounting them horizontally or at an angle could allow damaging moisture to enter. The manufacturer’s installation manual will tell you if the disconnect switch can be mounted in any other way than vertically.
When using NEMA 4 waterproof or NEMA 3R rainproof boxes, check to ensure that proper connections suitable for wet locations are made. Also, check that conductor connections in outdoor boxes or enclosures are made with waterproof wire nuts, heat shrink–covered crimp-type splices, or even connections listed as suitable for direct burial. Check that the disconnect means and overcurrent protection for the array are connected correctly and sized properly.
Combiner Box
If the PV system has a combiner box, it is the next item to check. Make sure it is placed in an easily accessible location and that it is suitable for an outside installation. If fuses or circuit breakers are used to provide protection to module strings, check that they have the correct current and voltage rating, and make sure they are DC-rated. Also, combiner boxes are usually rated as a NEMA Type 3R enclosure and are typically listed to be installed only in an upright vertical position. The manufacturer’s installation manual will tell you whether the combiner box can be mounted in a position other than vertical.
Array Mounting and Foundation Inspection
Next, check whether the array is securely fastened directly to the roof or the system mounting rack with the manufacturer’s supplied or specified hardware. Also, check to see that all roof penetrations are flashed correctly so there will be no leakage around them. Ground-mounted or pole-mounted arrays need to be checked to ensure that the foundations and mounting structures are strong enough to support the array in high-wind conditions.
System Conductor Ratings and Sizes
You then need to check the system’s conductor ratings and sizes. Make sure that the conductor insulation is rated for wet locations. When the modules used in the array do not come factory-installed with connection leads and MC-type connectors, make sure that the wiring used to make module-to-module connections is USE-2 or an identified and listed PV cable. Check that any conductors used in conduit have insulation suitable for wet locations such as THWN-2, XHHW-2, or RWH-2. Also, check one last time to make sure that the size of the conductors used will adequately carry the supplied current and keep the voltage drop to an acceptable level.
Battery Bank Configuration
If the PV system has a battery bank, check that the configuration is correct and the proper number and model of battery are used. Make sure all wiring connections are tight and the wiring is arranged and supported neatly and in compliance with code. Check that the disconnect means and overcurrent protection for the battery bank are connected correctly and sized properly.
Charge Controller Connections and Parameters
If the PV system has a battery bank, a charge controller will be present, and this is the next item to check. Using the manufacturer’s installation manual as a guide, check to make sure that all connections are correct and tight. Also, check to ensure all of the charge controller’s operating parameters are correct.
Inverter
Next, check the solar inverter. Just like with the other components of the PV system, you need to ensure that all connections are correct and tight. Use the manufacturer’s installation manual as a guide. Then, check that all of the inverter’s operating parameters are correct.
Load Entry
The next item to check is the load entry. In a stand-alone PV system with DC loads, check that the DC connections to the load entry are correct and that all DC branch circuits have the proper overcurrent protection. In stand-alone and grid-tie PV systems with an AC load entry, check to make sure the appropriate connections are made to the load entry and the AC branch circuits have proper overcurrent protection.
Signage
The last thing to check is the signage. First, make sure the signs located outside are made to withstand an outdoor environment. The lettering on all signs should be engraved, machine printed, or electroplated in a color that contrasts with the sign background for easier reading. Make sure the signs are located on or immediately adjacent to the specified equipment. Finally, check to make sure the signs have the required information for the location where they are installed.
The Big Picture
The comprehensive final check before starting up a PV system is crucial to ensure the system's optimal performance, longevity, and safety. By meticulously examining various components such as array configuration, wire management, grounding, and system conductors, issues can be identified and fixed before system activation. This thorough inspection not only safeguards against operational disruptions and potential hazards but contributes to the PV system’s overall efficiency and reliability. Additionally, ensuring compliance with industry standards and best practices during the final inspection enhances system efficiency and overall performance.