Facebook
 Google
 GitHub
 Linkedin
Digital Multimeter Basics
Learn how to safely and effectively use a multimeter for taking electrical measurements.
The digital multimeter, or DMM, is like an electronic tape measure for taking electrical measurements. It uses a digital display to show, for example, volts, ohms, and amperes. Other features such as a capacitor checker, temperature tester, and diode tester are available on some models. A common DMM is shown in Figure 1. Wearing gloves gives the user an extra layer of protection against shock.

Figure 1. The digital multimeter, also known as a DMM, measures voltage, resistance, and amperage. Image courtesy of Amprobe
Note: gloves will not prevent severe shock.
A meter that uses a swinging needle to display reading is called an analog multimeter. The first multimeters were analog or meter movement types. We will concentrate on the DMM since it is the predominant instrument used in our profession today.
Picking the right meter for the job can be complicated if you don't know what features to look for and what they do. This section is designed to assist you in selecting the multimeter that will work best for you. When selecting a good quality meter, it is important to answer the following questions:
■ What are the safety aspects of the multimeter?
■ What features are you looking for?
■ What is the easiest approach to get the most out of your multimeter?
■ Which meter is appropriate to the environment in which you will be working?
Using and understanding the standard features of the instrument will allow you to derive the benefits of quick and accurate troubleshooting and problem-solving.
First, we will look at the importance of a DMM's accuracy, display, resolution, range, and RMS features. After that, we explore DMM options such as measuring voltage, current, and resistance, and other important readings found on a quality meter.
DMM Accuracy
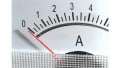
Accuracy refers to how close the DMM measurement is to the actual value of the signal being measured. Accuracy is expressed as a percentage (%) of the reading. The typical accuracy of a quality DMM meter is ±1% or less. This means if the true voltage is 120 V, the display will be within ±1.2 V of the real voltage and show a reading of 118.8 to 121.2 V. This level of accuracy is good for HVACR work. Analog multimeters, the meters with a needle-type movement, are less accurate. For example, the typical accuracy of a good analog multimeter is ±2%. This accuracy is at the midrange or middle portion of the analog scale, as shown in Figure 2.

Figure 2. The analog voltmeter has its best accuracy in the middle part of the scale. Accuracy drops off dramatically at the lower and upper scale readings. At the midrange, the analog scale is ±2% accurate.
The accuracy on the lower and upper ends of the analog scale drops dramatically. At one-tenth of full scale, the level of accuracy drops by 20%. Analog multimeters can be used in our profession as long as the user is aware of the inaccuracy of the readings on their lower and upper scales. The analog meter is most accurate in the middle 50% of the scale.
DMM Display
A digital display is easier for a technician to use and understand than an analog meter. The analog meter requires the interpretation of various scales and estimation of the values that fall between the lines. In contrast, with a DMM, a technician can choose to display readings to several decimal places. This enhances the accuracy of digital meters.
Quality DMMs may have a bar graph that shows changes and trends in the measured signal. Such a bar graph is shown in Figure 3, below the voltage reading on the digital display. At a full-scale reading of 1,000 V, the bar below the digital readout fully populates the bar graph. The DMM display is durable and less prone to damage when dropped or when the meter range is exceeded when compared to instruments with a needle-type movement.

Figure 3. At a full-scale reading of 1,000 V, the bar below the digital readout stretches the full length of the bar graph. A quarter bar would indicate a voltage reading of 250 V. Image courtesy of TecraTools
DMM Resolution and Range
Resolution refers to how accurate or fine a measurement a meter can take. By knowing the resolution of a meter, the technician can determine if it is possible to see a change in the measured signal. For example, in the 150-V range, the meter can measure voltage in 1-V increments. A specific meter would need to be selected if half-volt increments were required. It is important to have a DMM that can measure volts, amps, or ohms in one-digit increments. You will find that most meters will measure better than this, down to the tenths, such as 120.2 V or 5.5 V. Finer measurements are not normally required in the HVACR industry; in fact, even decimal readings are not normally required and sometimes confuse the novice user of these instruments.
In summary, resolution, as it relates to a DMM, is the smallest change in measured value to which the instrument will respond.
As the range increases, the resolution decreases. Unlike high-definition television, the resolution has nothing to do with how clear or sharp the digital display is presented on the meter screen.
To determine the range and resolution of your DMM, turn the meter to the volt, alternating current range (ACV), and press the Range button. The Auto feature on the display will disappear. Depending on the selected range, the resolution will vary. Here is an example of the ranges and resolutions of a leading manufacturer’s digital meter:
| Range | Resolution |
| 600.0 mV | 0.1 mV (=1/10 mV ) |
| 6.000 V | 0.001 V (= 1 mV ) |
| 60.00 V | 0.01 V (= 10 mV ) |
| 600.0 V | 0.1 V (= 100 mV ) |
| 1,000 V | 1 V (= 1,000 mV ) |
For maximum resolution, choose the lowest possible range. To exit the manual Range mode, hold the Range button for 2 seconds. (Note: The procedure for exiting the manual Range mode varies among manufacturers.)
Note:
One of the fundamental steps of electrical troubleshooting is voltage measurement. After surveying the job site and testing for proper supply, voltage is usually the first step taken when troubleshooting. If there is no voltage present, or if the voltage is too low or too high, the problem will need to be corrected before continuing the troubleshooting process.
Related Content